
This page discusses the construction and firing of a 1/120 scale trebuchet made entirely of toothpicks and some other common household objects. A trebuchet of this size is useful for hurling raisins, popcorn, cocoa puffs, wasabi peas and all manners of snacks.
Thanks to all your emails and comments on my original model trebuchet, it seems that trebuchets are very popular high school and junior high school projects, and this popularity certainly merits a follow-on trebuchet or two.
The major part of this article discusses the construction of the trebuchet.
At the end I discuss the performance and suggested improvements for
the trebuchet.
|
|
|
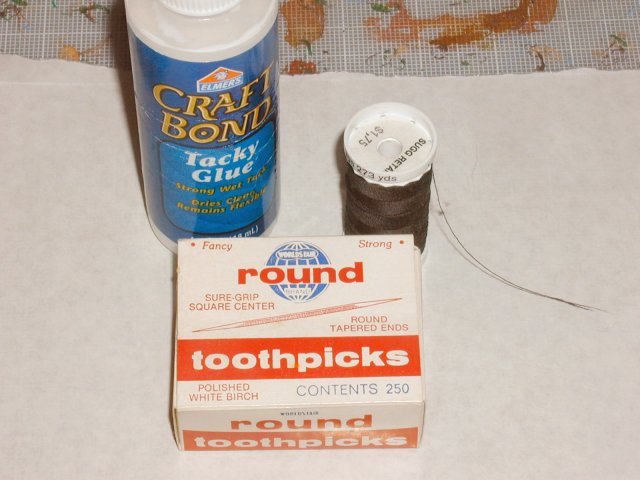
This project is very frugal on materials with most of the items pictured at right: toothpicks, some strong thread, and tacky glue. Additionally, you will need some nuts and bolts, a fishing lure, or other heavy object to use as a counter weight. The total cost of materials is about $3 to $4 or less if you already have the glue and toothpicks lying around the house.
Tacky glue, sometimes called craft glue, is a must
because it is very thick and helps hold the thread and parts together.
It dries quickly and does not run all over.
For thread, I used ordinary sewing machine thread, but in hindsight,
I think a thicker weight thread would look better and speed things up.
My local hobby store sells a thick thread that model boat makers use
for rigging ships.
Thicker thread is easier to work with, requires less windings to attach
parts. It also looks more like scale rope, so I think the final model
will look a little more authentic.

|
|
|
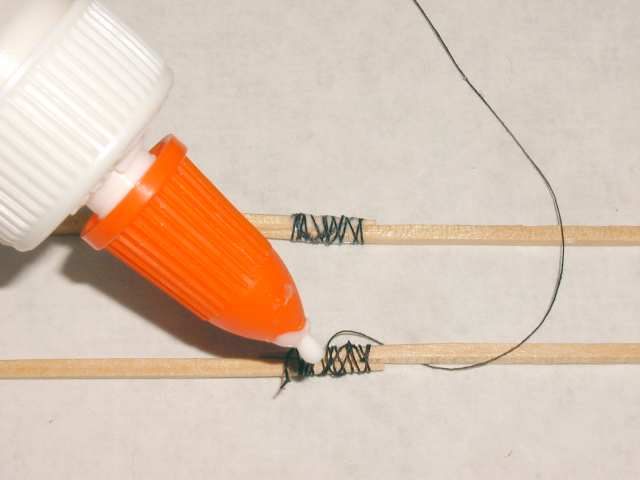
The photo at right shows how to join two toothpicks together. Put a big dollop of glue where the toothpicks meet and hold an end of the thread with your thumb and fore finger. Then wind the thread through the glue and make sure the wood and the thread get nicely coated with the wet glue. Tweezers are a useful tool for winding the thread around small parts and tight spaces. Sometimes it helps to tack the toothpicks together with a tiny drop of glue and let that dry. Then rewet with more glue and lash with the thread.
By the way, you likely will get glue all over your fingers, the
table, and your model.
Simply let it dry and rub it off.
To protect your table top use a piece of wax paper or some other
glossy paper.
This will prevent your model from sticking to the table.
|
|
|
There are easier methods of joining toothpicks, but using glue and thread has to be one of the strongest. The joint is much stronger than the wood itself, and any excessive torsion or stretching always breaks the wood before the joint. Also, the tacky glue and the thread are quite flexible, so any twisting or compressing of the model tends to bend the joint rather than break the model. No wonder why the ancients often used trees and glue and rope to build houses and fences.
Typically I would cut about 1 foot (30 cm) of thread per joint and start lashing.
Once the lashing was done, another drop or two makes sure
everything was nice and wet. Then let dry.
I couldn't help but feel like the "Bob the Builder" character
who constructs his projects endlessly with wet mucilage.
|
|
|
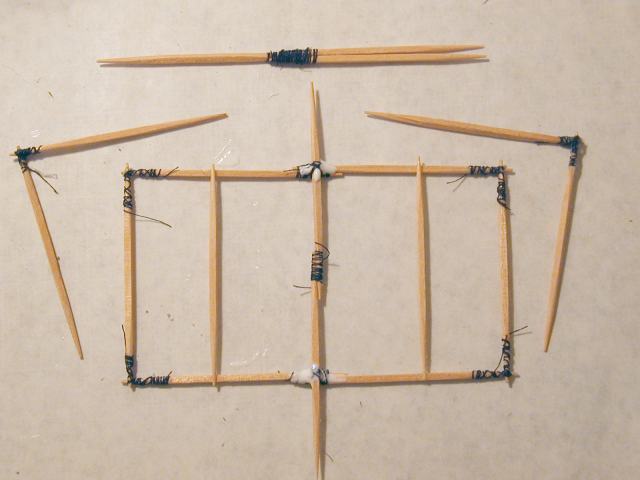
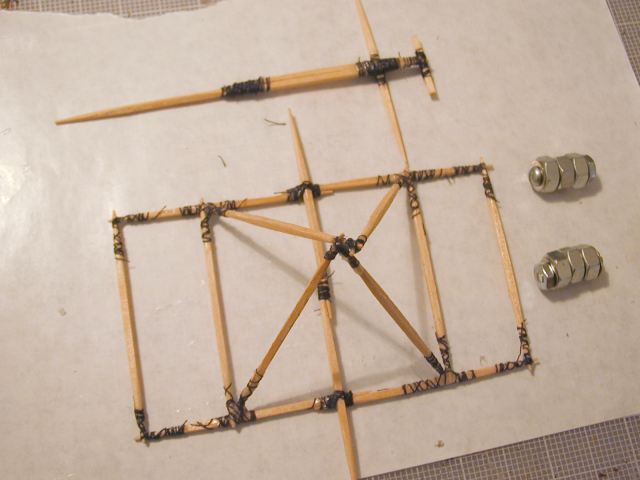
I didn't have plans, but I used my previous trebuchet as a conceptual model.
At right we see a few of the first pieces forming.
At the top is the throwing arm made from three toothpicks.
At the bottom is the base of the trebuchet, about two
toothpicks long and one toothpick wide.
Across the middle of the base frame is a long outrigger
which will help the two triangular support frames stand upright.
The other angles are the supports which will help hold
the axle of the throwing arm in the air.
|
|
|
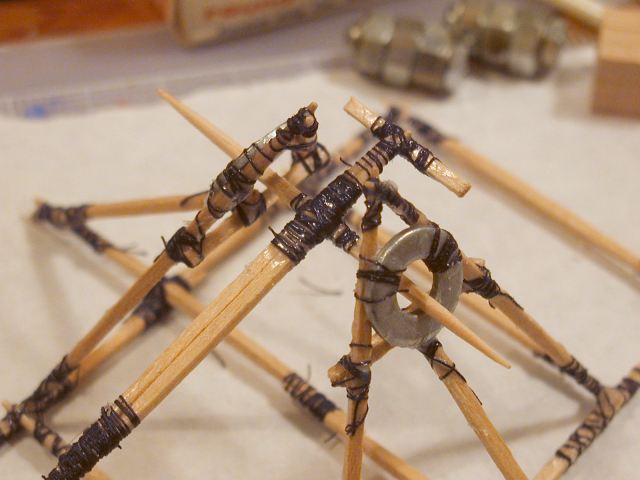
Now the supports are propped in the air and lashed to the base frame. For now they rest against each other, but eventually they need a gap in between so that the throwing arm can rotate without getting hit.
Also the throwing arm requires a few additional pieces. The long cross piece will form the axle about which the throwing arm rotates. The smaller cross piece is the arm from which the counter weight will hang.
This article does not cover trebuchet theory, but basically
the throwing arm is a see saw.
The weight of the counter weight pulls one end of the see saw such that the
other end whips the projectile in the air.
The weight of the counter weight is much more (50 times) the weight
of the projectile, and so the length of the throwing arm from
the axle to the weight can be shorter than the length from the axle to
the projectile.
|
|
|
Obviously one can get carried away with all the lashing! Here I show the throwing arm axle inserted into the two metal washers I use as the throwing arm supports. The washers are lashed to the apex of the support triangles that are lashed to the base. Additionally, I added two outriggers to hold up the support triangles and keep the space for the throwing arm in the middle.
I didn't intend for the trebuchet construction to become so complex, but the materials were cheap, and it became an issue of investing more time to make the construction more sturdy. Often I said, "Well let me add this here" and "let me put an additional brace there," and suddenly I had a hundred and one joints.
Perhaps you can come up with a simpler design. The goal is to hold a heavy counter weight sturdily, and allow the throwing arm to move quickly and not get caught on any of the supports.
|
|
|
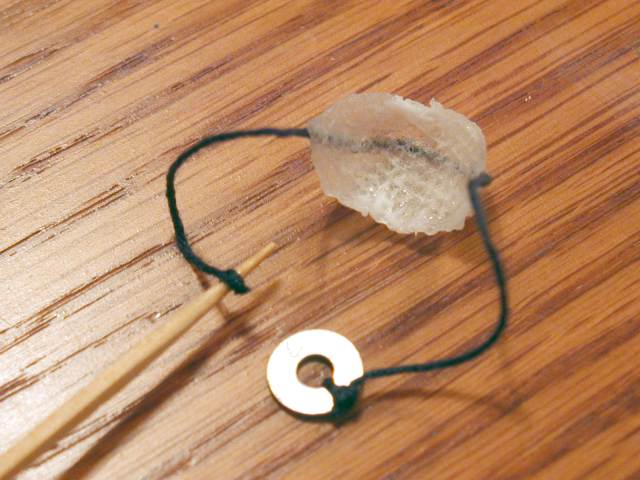
The photo at right shows how to make the sling and pouch for the throwing arm. One end of the sling is fixed to the throwing arm with a knot and glue. The other end is tied to a washer which is placed on the end of the throwing arm, but then flies off the arm as it throws allowing the pouch to open and the projectile to launch,
The pouch is made from paper towel, glued to the string, and shaped with more glue. This pouch is made to hold raisins, popcorn, cocoa puffs, wasabi peas, and other snack foods.
Ideally, the length of the sling and the angle of the
prong (which here is simply the point of the throwing arm),
is tuned such that the projectile leaves the pouch
at an angle of 45 degrees from horizontal.
Ignoring other factors such as winds or intervening
obstacles, a 45 degree angle gets you the farthest projectile distance.
|
|
|
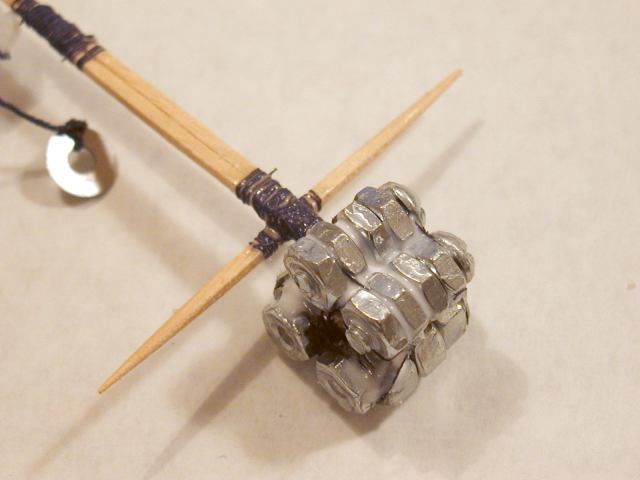
This photo shows the other end of the throwing arm and the counter weight. Initially, I made a counter weight from two bolts and a few nuts and had it hanging from the throwing arm. Then I decided this tiny trebuchet was strong enough to bear much more weight, so I added a few more nuts and bolts. Space dictated that the counterweight be fixed to the throwing arm.
Judging by feel, I think these nuts and bolts weight about 4 to 6 ounces
(100 to 200 grams)
The construction technique of glue and lashing is so strong that
this model can hold much more weight: about 1 or 2 pounds (500 to 1000
grams).
The problem was there was not enough room in the frame to hold such
a weight.
Perhaps a fishing lure made from dense lead would have
better than the nuts and bolts made from steel.
|
|
|
|
Here our Roman field commanders have dragged the model trebuchet into firing position. Of course, this is a bit of a fantasy since the Romans were not known to use trebuchets. The trebuchet really became more commonly used around the 10th or 11th centuries long after the Roman empire faded into inconsequence. The Romans, however, were known to use catapults and ballistas extensively in battle.
The arm is cocked and ready to fling the deadly raisin in the pouch
into the enemy camp.
When firing it helps to have a few dogs handy to clean up the
scattered snacks.

|
|
|
In field tests I was able to hurl raisins and popcorn kernels about 3 to 4 feet. This was a bit of a disappointment as it is only about 12 times the length of the trebuchet, and I was hoping to fire a raisin about 10 feet. On the other hand, I did not spend a lot of time tuning and improving the shooting characteristics of the model.
The main problem with this trebuchet is the sling and the pouch. My trebuchet throws a projectile farther from the end of the throwing arm than from the sling and the pouch. My pouch is shaped with glue and very rigid. Unfortunately this holds the projectile too long, and the throws are more of a line drive than an nice 45% lob. To improve this I could come up with a more flexible pouch or perhaps trim the pouch down so it is less constricting. Alternatively, shortening or lengthening the sling could affect when the pouch opens.
Another way to improve the throwing distance would be to pay more attention to the design and dimensions of the trebuchet. Trebuchet design is a science based on physics, and there are many trebuchet simulator programs out there that help you select many dimensions of the trebuchet. These simulators help pick the length of the sling, the throwing arm long arm (from axle to tip) and short arm (from axle to counter weight). They also help pick the weight of the counterweight based on the weight of the projectile. Obviously the ad hoc dimensions I chose could be tweaked for better throwing.
More distance could yet again be made by having a heavier counterweight. As mentioned, the glue and lashing construction of the trebuchet is very strong and can hold much more weight. Perhaps a very dense material such a uranium would really fling the projectile.
Nevertheless,
this tiny toothpick trebuchet is a fun project
involving minimal cost.
The trebuchet is a wonderful invention,
using simple, ancient ideas and the power of
gravity to hurl objects great distances.
There also is a joy in creating a machine from simple,
everyday objects
and filling that machine with your
descisions from the world of design choices
and possibilities.
As you create such a project, and you run in to
successes and shortcomings,
you are prodded to think and ponder
about the world of options from which to choose.
It is hoped that by considering my trebuchet and
constructing your own that you too will
come into this world of possibilities.
Thanks for reading about my trebuchet.
People interested in ancient technology and society may also find these articles interesting: