Constructing a 3D Settlers of Catan Board
Part I - Prototyping and Mold Making
This article in four parts describes the construction of a three dimensional board
for the family strategy game The Settlers of Catan.
This game is designed by Klaus Teuber and first released by Kosmos in
Germany in 1995.
It was later released by Mayfair in three editions in the United States.
Since then both companies have released numerous add ons and sequels
such as The Seafarers of Catan.
You can read my critical reviews of these board games
at The Settlers of Catan
and The Seafarers of Catan.
For those who want a quick summary of the review, I like Settlers very much.
Probably I have played it more times than any other board game.
Also, I have devoted more hours to it than any other game, computer, card, or board, or
otherwise.
Year after year, I pull it out of the game closet and play it some more.
Needless to say, I enjoy this game very much.
And given this enjoyment and all the hours I spend with the game,
I feel the game merits more than just the cardboard hexagons that form the game board.
So I decided to create a more three dimensional board that would hold the game pieces.
| Hex type
| 3 - 4 Player
game count
| 5 - 6 Player
game count
| Total
|
| Farm/Wheat | 4 | 2 | 6
|
| Forest/Lumber | 4 | 2 | 6
|
| Pasture/Wool | 4 | 2 | 6
|
| Mountain/Ore | 3 | 2 | 5
|
| Hill/Brick | 3 | 2 | 5
|
| Ports | 9 | 2 | 11
|
| Water | 9 | 2 | 11
|
| Desert | 1 | 1 | 2
|
| Totals | 37 | 15 | 52
|
|---|
The first step was to decide on the medium.
Looking at the table, there are 8 different hex types,
more if you decide to create individual port hexes. I decided
to implement one basic port hex and add a token or marker
to differentiate the different port types.
With 50 total hexes to manufacture for a 6 player game, and not desiring to turn
my house into a manufacturing center,
I needed some process that could be repeated easily.
I saw lots of model makers have luck with creating resin cast
pieces, so that's what I decided to use.
There are four major steps to making these hexes:
- Prototyping - sculpting and modeling the original piece for the hex.
- Mold making - making a mold that will be used to cast the pieces.
- Casting - repeatedly filling the mold to make hex blanks.
- Painting and finishing - sanding, priming, and detailing the pieces to make the final hexes.
Each of these steps will be described in detail.
This article deals with the first two steps,
prototyping and mold making.
|
|
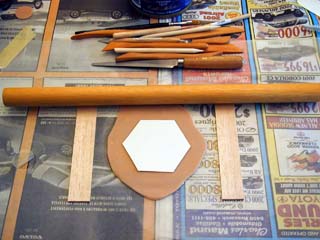
Rolling out clay for the hexes
|
To the left we see the first step of sculpting the original piece.
This is by far the most time-consuming step of the process.
The sky is the limit to the amount of time and artistic creativity you
can invest in a piece.
This photo shows the clay being rolled for the first hex piece.
For clay I use "Super Sculpey" sculpting clay by Polyform Products
which is available for about $7 per pound at hobby and art stores.
This petroleum clay has a sculpting feel like natural clay and can be baked
hard in the oven.
You must work the clay with your hands until it becomes soft and pliable.
To roll clay to a uniform thickness, use some wooden guides as I show here.
Each of the strips of wood hold the roller at a uniform height to
get a nice flat clay slab to begin with.
In the center I have a cardboard cutout to create the correct dimension
hex, slightly less than 3 inches (7.5 cm) in diameter.
This is slightly smaller than a Settlers hex. The guide I used was
the hex pieces from the Tikal game.
Notice also that my work surface is covered in newspaper and the
clay area is covered with wax paper to prevent the clay from sticking
or becoming dirty from the newsprint.
|
|
Rolling out clay for the hexes
|
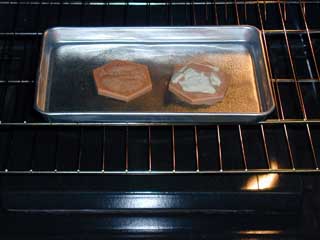
This photo shows the first two hex prototypes being fired and hardened in the oven.
On the left is the slightly hilly Pasture/Wool hex.
On the right is the rocky Mountain/Ore hex.
The mountain hex is multiple colors because a few of the mountainous rocks
are casts of rocks.
These rocks were painted with curable latex rubber (available at Model Railroad hobby stores).
Then, the real rocks were popped out of the latex rubber and the mold
was filled with resin.
So particular hex was sculpted from clay and resin rocks.
Invest as much time as you like in creating the prototypes.
You can be as fancy or as simple as you like in this step.
These prototypes took about 90 minutes each to sculpt
which was done while I was watching a movie.
Whatever you do, remember that each detail of your work will be reproduced
nearly perfectly in the final product.
Even unwanted details such as fingerprints on the clay or stray hairs
will show up in the final model,
so be careful and sculpt the exact figure as best as you can in the
prototyping stage.
|
|
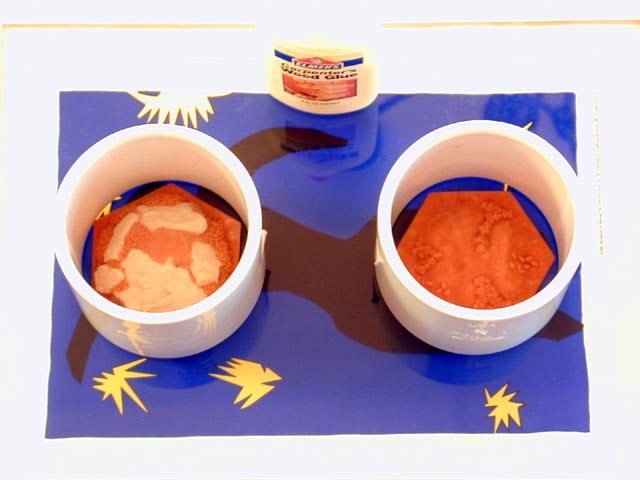
Making forms for the molds.
|
Once you have finished your prototypes, the next step is to create a mold
from the prototype.
Whereas the prototype stage is more of a "fine art" project,
the mold making step is more of an industrial art project.
That is to say this stage requires more manual labor than
dexterity.
The mold material is liquid silicone,
so you need to build a water-tight container to hold the
liquid mold material.
The easiest way to do this for a small hobby prototype is shown in the picture.
First, glue your prototype to a piece of glass.
Here a framed print of the great artist Matisse serves as a base
for my project.
The two clay hexes are glued to the glass with Elmer's Carpenter's Wood Glue.
The glue should not be permanent, because later you must break the
piece from the glass without destroying either.
I like Elmer's because it is thick enough to prevent
the silicone flow, but with the lack of air due to non-porous glass,
the glue never really dries and is easy to release.
A piece of PVC pipe forms a dam around the prototype.
You can use stock pipe, but here I use a 3 inch (7.62 cm) coupling
which costs about $0.40 at a hardware store such as Home Depot.
PVC is a nice material because the silicone does not stick to it,
and the coupling can be used over and over again.
In fact I used these 2 couplings to make all 8 Settlers molds.
You can use a larger or smaller pipe depending on the size of your prototype.
Here I use one that just fits to help conserve on the amount of silicone.
Use a string of clay where the pipe meets the glass to prevent the
flow of silicone at the base of the mold form.
|
|
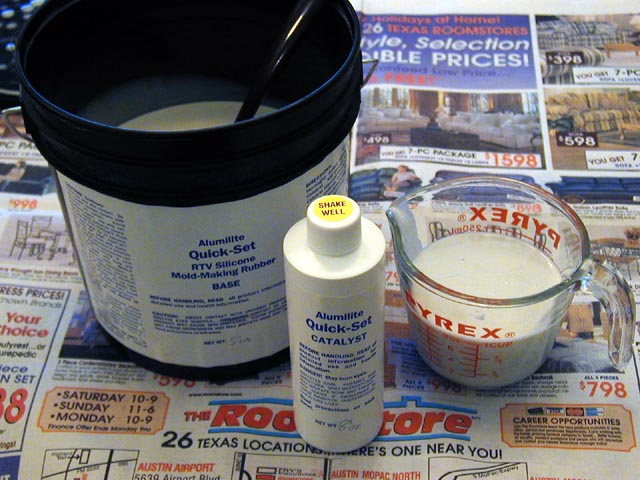
Mixing the silicone.
|
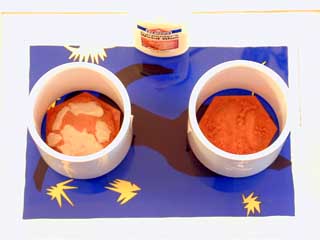
Here I show the silicone mold making material.
There are many flavors and brands of silicone with each
manufacturer emphasizing certain material
characteristics (hardness, elasticity, surface finish).
This 5 pound (2.2 kg) bucket of silicone is available from
Alumilite Corporation
for about $90.
You can also get smaller 1 pound or larger 10 pound buckets
You can make about 20 Settlers hex size molds from this bucket
so the molds involve about $5 of material each.
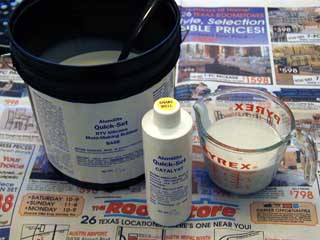
The silicone comes in 2 parts, a base and a catalyst
which are mixed about 10 parts to 1.
The base is milky white, is very sticky, never hardens,
and smells like petroleum jelly.
The catalyst is orange and gives the mixed silicone
a yellow or cream color when it is mixed.
The silicone becomes tacky in about 4 hours, and
it becomes fully cured in about 24 hours.
The fumes from the material are mild, but be sure
to work in a well ventilated area with the windows open.
Once again, I have covered the work area with newsprint.
I also use plastic tools and glass containers
because once the silicone hardens, it is easy to peel
from these materials.

|
|
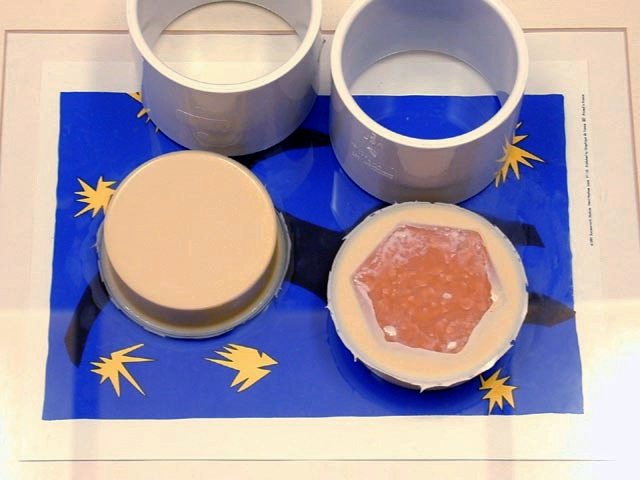
Releasing the mold.
|
Twenty four hours later, the silicone has hardened and the prototype is ready
to pop from the mold.
The PVC slides easily off of the silicone cake
which looks quite a bit like a cremè brûlée.
With a twisting motion, the prototype can be popped
from the glass.
As you can see in the photo, the glue on the base of the prototype
has not dried, but it has performed its function of
stopping
the silicone from flowing under the prototype.
Using a razor knife, trim the excess flash from the edges of the mold.
The silicone is dense and heavy and cuts as easily as tofu.
Wash the mold in soapy dishwater to remove any excess catalyst.
If you have used too much catalyst, the mold will exude more
of the slippery catalyst over the next few days.
Just make sure to wash you mold before you throw some casts
so that the orangy catalyst does not discolor your castings.
|
|
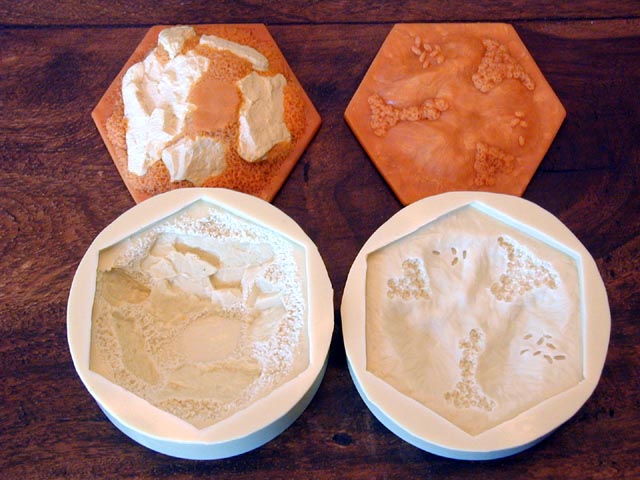
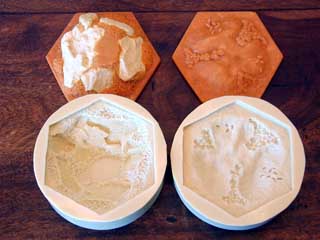
The final mold
|
And here we see the final result of the mold-making.
The original clay prototypes are shown at the top of the picture,
and the silicone molds are shown at the bottom.
A mold such as this will make about 100 hexes before it loses
it flexibility and starts to tear.
For the Settlers of Catan we need only about
6 of each hex type so we are well within the lifespan of
the mold.
However, if you need more hexes, or you want to go into production,
simply make more molds.
The original prototype should also last through about 100 molds,
so you will be able to make plenty of hexes.
If you are really artistic, you might want to make
3 or 4 different kinds of mountain/ore hexes.
That would really make a unique and varied playing board.
Part art and part industry, prototyping and mold making
is a fun thing to do.
But we have only taken the first step in a long journey.
Now that we have our molds we can begin the casting process
and make a few blank hexes.
Time to move onto the next step in the process.
If you like miniatures, modelling, and historical
battles, you might like Dan Becker's Miniatures Site.