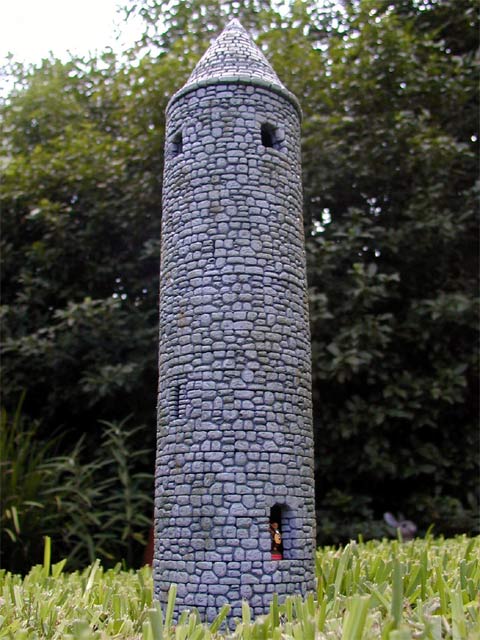
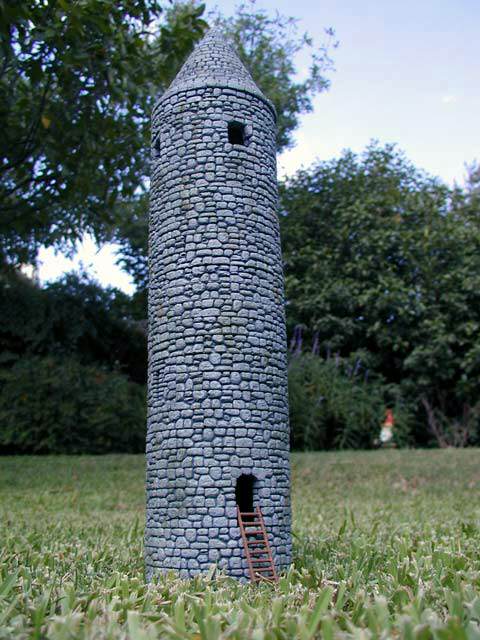
This article discusses the design and construction of a Celtic Round Tower in 25mm (1/64th) scale using plaster blocks cast from Hirst Arts silicone molds. The tower shown at right is nearly 20 inches (50 cm) tall, and to give you an idea of the scale, that's a 15mm spearman standing in the doorway near the bottom of the tower. The tower is painted with latex and acrylic paints and coated with a clear matte acrylic protective coating. Unlike my other towers (Round medieval dice tower, Campanile dice tower, Basswood dice tower, Laser cut dice tower ), this is not a dice tower but purely a scale architectural structure suitable for miniatures gaming.
Can you spot the rabbit in this photo?
Click on any photo to get a larger view.

|
|
|
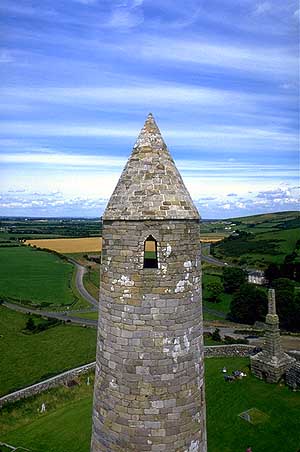
Most of the towers were built from the 7th to the 10th centuries. The most common uses of the tower were as bell towers, lookout points, and refuge from marauders. All towers have a single entry door raised 12 to 20 feet (2-6 m) from the ground, always facing the church. Monks entered the door with a ladder and then withdrew the ladder into the tower to prevent enemies from following. The top floor invariably had 4 windows providing a clear view to all sides of the tower.
Although round towers were built throughout the world in the dark and medieval ages,
the Celtic Round Tower, with its distinctive roof and raised front door,
is found mostly in Ireland with one or two examples
in Scotland and the Isle of Man.
|
|
|
The photos of the towers of Kilmacduagh and Cashel at right are
from the Sacred Sites
web site.
This site is also a nice place to see maps and read up on the Irish towers
as well as other wondrous places around the world.
|
|
|
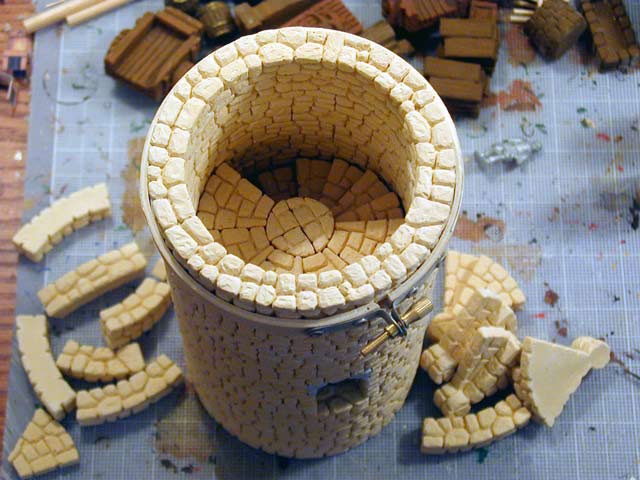
The picture shows another course of fieldstone bricks applied to the top of the tower. I use an inexpensive ($0.89) circular cross stitch frame to clamp the blocks to the previous course and to keep the tower round. Notice that unlike the real Irish towers which gradually become more slender to the top, I had to make a compromise and make a purely cylindrical tower. Some of the photos can hide this deficiency. Simply use a low angle and a wide angle to exaggerate the perspective and create the illusion of a slope near the top.
Also notice that originally I built a stone spiral staircase within the tower.
As I never have been inside a round tower, I assumed that this was the likely interior.
However, after reading the Lalor book, I found that most Irish round towers
simply had wooden floors and ladders between the floors.
So eventually I scrapped the spiral stairs and kept a stone floor
with some trap doors for ladders.
Great for avoiding Vikings, but woe to the bell ringer who
had to climb the five or six stories with only a ladder.

|
|
|
I constructed the two blue molds in the photo from high strength silicone rubber from MicroMark. Don't get the flimsy one to one silicone, as I've used this before, and it tears easily after a few castings. The high strength 10 to 1 mixing silicone is better, but still not as nice as a Hirst Arts mold. The MicroMark silicone tears after a while, and it is harder to clean than the Hirst mold material.
I made mold boxes for the silicone from cheap food storage containers, but the bottoms were not absolutely flat and thus the molds are slightly concave. This caused difficulty when scraping excess plaster from the mold. Not a big problem, but it caused a few uneven castings.
As you can see, the round mold to the right can cast an entire
round course of bricks in one go,
as well as many floor and miscellaneous blocks,
so this speeded up casting and assembly time greatly.

|
|
|
Don't worry if you do not have this mold. Simply use Super Sculpey III modeling clay (a polymer clay that is cured by baking in the oven) and mold the arches by hand. Detail the stones with a plastic knife. Bake in the oven until it is rock hard. After painting I don't think there will be a noticeable difference between highly customized Hirst blocks and something you build yourself.
Also notice that most Irish round towers had lintels over the doors
and window.
If you want to be positively true to the original (or the prototype
as they say in model railroading),
carve a big granite slab over your fensters.
|
|
|
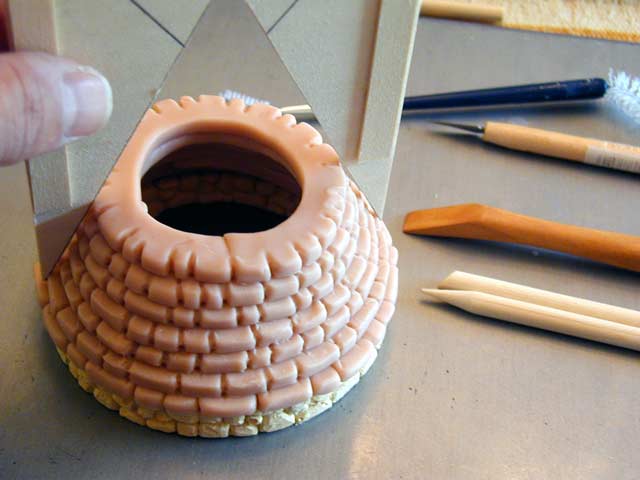
Take some Super Sculpey III modelling clay, a rolling pin, two pieces of 1/4 inch thick basswood, and roll out 1/4 thick slabs of clay using the wood as a thickness guide. Cut the slabs into 1/2 inch wide strips. Coil the strips into courses above a 4 inch round set of Hirst Arts fieldstone bricks. Then take a few blunt tools such as the ones shown in the picture and put indents in the slabs to make them look like individual fieldstones. Once the conical roof is molded and baked, sand it a bit to get the characteristic sloped stones typically used in a Celtic Round Tower.
The picture shows a basswood guide with about a 75 degree incline.
I used this guide to make sure the conical roof had a constant slope.
Perhaps an easier way to make a roof would be to get a conical cup
(like the Dixie cups at a water fountain) and wrap the slabs
around the cup.

|
|
|
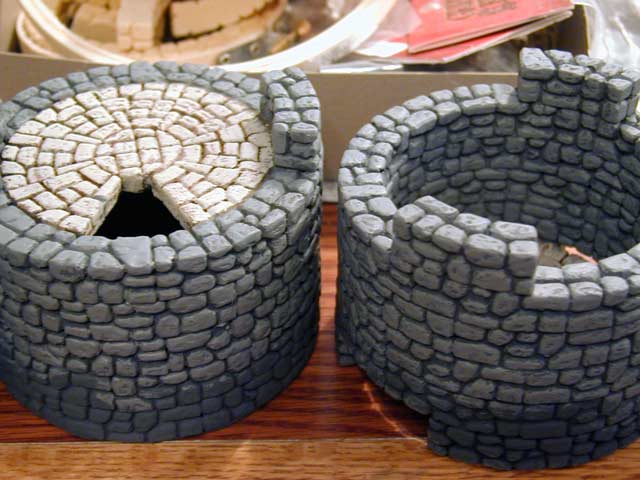
This photo also shows how each floor is keyed to fit snugly with the floor below. Two of the eight round fieldstones are glued to the floor below and six are glued to the floor above. The projecting lower floor keys are opposed to each other, but each floor has the keystones at a different angle so that the tower assembles in one way only.
The keystones also keep the three arrow slit windows wrapping around
the back of the tower.
Unfortunately, my windows wrap in the wrong direction.
According to the Lalor book, as you ascend the windows of a
round tower should wrap counter-clockwise around the center
(also known as a right-hand ascent).
This is opposite to most castles where the stairs wrap clockwise
as you ascend to aid the right-handed defenders at the top of the stairs.
Fascinating round tower trivia! Why did the monks do this?
|
|
|
Normally spray paint is a quick way to get a base coat, but with these field stones, it is quite difficult. I had to spray many coats from all different angles to make sure all the cracks and joints and corners were filled. I think a diluted latex paint and fat brush might have been a quicker base coat process.
Following the base coat, the exterior field stones are coated with
a lighter medium gray. This is shown on the top halves of the models.
Later on I dry brush an even lighter highlight gray.
To make the floors stand out, I coated them with
a medium brown middle coat,
and a light beige highlight coat.
These floor stones are shown on the first floor on the left model.

|
|
|
The ladder is made from Midwest Products dowels and dabs of tacky white
glue.
I attempted to find premade scale ladders, but could only find
HO or N scale.
The 15 mm Dark Ages warriors are about to storm up the ladder of the tower!
|
|
|
Can you spot the leprechaun in this photo?
Click on any photo to get a larger view.

|
|
|
This tower is the inspiration for creating my Celtic Round Tower. It is a beautiful place to visit -- a mystic glen between two lakes and the barren windswept Wicklow mountains. It is a fond memory for me, because on a soft foggy day in 1998, I proposed to my wife here. Luckily she said yes to me, and she also says yes to my hobbies - she's a keeper.
And thank you too for reading and staying with me this far.