
What is a dice tower? It is a structure used to roll dice such that the dice are adequately tossed and randomized. It helps prevent cheating by assuring one cannot influence the dice roll. Often the towers are provided with trays that prevent the dice from scattering across the table. It also serves as a focal point for the gaming table: one no longer has to look at various locations to find the dice. One simply looks to the dice tower.
However, dice towers can go beyond utility into the world of art. They can be decorated to echo the theme of a game or a particular era. They can be constructed to make a nice sound when used. They can also provoke thought to the construction of the insides. Dice towers have long provided me with a sense of admiration. In addition to this page, I have made dice towers from basswood and laser etched wood parts. As the cello is to the cellist, so too is the dice tower to the board gamer.
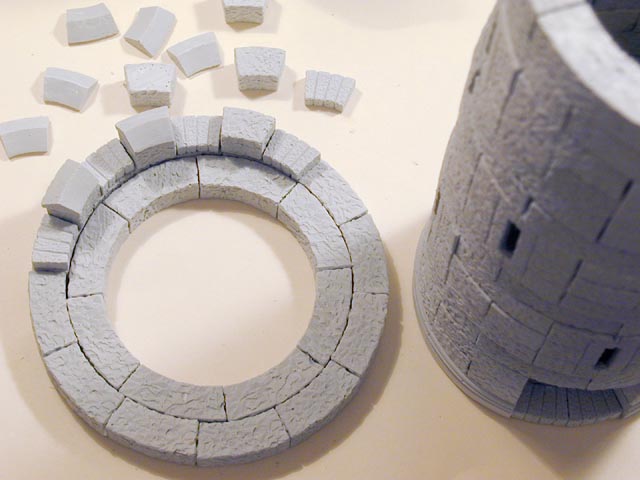
This page shows how to make a dice tower using plaster and a mold
from Hirst Arts Fantasy Architecture.
You use the molds to cast stones from plaster.
You stack the stones and build a structure that is as simple
or as fancy as you like.
Then you can paint and decorate your work.
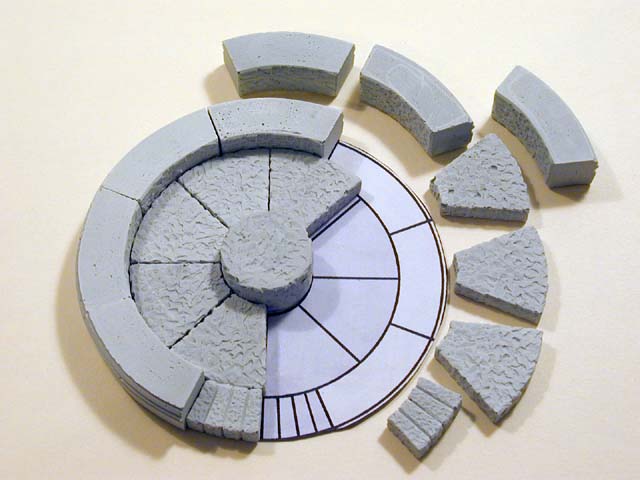
As you can see in the photo, the stones are somewhat like architecturally
correct building blocks.
Often these blocks are used with miniatures gaming terrain or model railroading.
Here I modify the tower to be used for rolling dice, and as such the
interior of my tower is different than the plans on the Hirst Arts site.

|
|
|
The plaster is a special type similar to the material that dentists use to cast tooth impressions. The brand is Excalibur Castle Stone It comes in a variety of colors, sets quickly, is less brittle than Plaster of Paris or hydrocal, and is easy to paint. For $38, Game Plan Games sells a 25 pound box which should last for many projects.
Simply mix a small cup of plaster to the consistency of thin pancake batter (about 22 ml of water to 100 g of dry plaster) and pour the slurry into the mold. Pound the table with your fist or use a toothpick to help release air trapped in the cavity. I add about 10 drops of Jet Dry brand dishwashing liquid to a liter of water to help break the surface tension of the water and release any bubbles.
After about 5 minutes of setting, I use the wide spatula to scrape off excess plaster and level the bottoms of the blocks. In about 25 more minutes, bend the mold to pop the blocks out of the mold. You will need to cast the mold about 18 times to have enough stones to make the dice tower. After nearly 100 castings, my mold shows no sign of tearing or wear.
The setting time of the plaster is sensitive to temperature. I do
my casting in the garage and once during cold weather of 32F (0 C), it
took the blocks nearly 2 hours to set.
After that I left my water bottle inside the house, and the room temperature
water was enough to cure the blocks in the normal time.
|
|
|
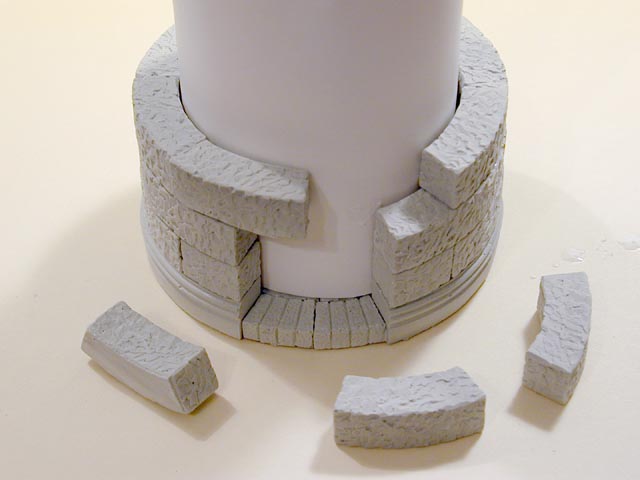
Here I glue the blocks to each other using Elmer's Craft Bond Tacky Glue.
The glue is thicker than normal white or wood glue, and it sets in 15 minutes
which helps you build your tower more quickly.
This part of the construction is especially fun and
hearkens back to the days of playing with blocks in kindergarten.
|
|
|
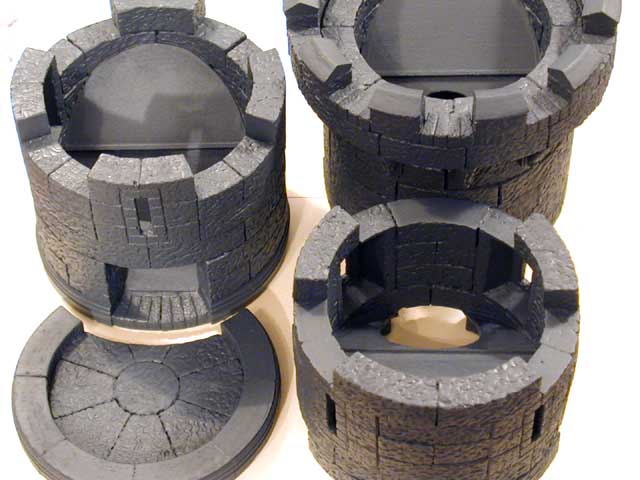
Notice that I have made a paper cylinder to help keep the tower vertical. It also helps keep the proper diameter although the blocks are nicely designed such that they always form a proper circle.
When constructing, I rarely sand the bottoms or tops of my blocks.
If you are careful with casting and leveling the stones, very little
sanding if any is necessary.
However, I am not the biggest stickler for a gapless tower.
As you see in the photo, there are slight gaps between some of the blocks.
I think the gaps make the completed tower look more realistic and aged.
If you want a gapless tower, you should slightly sand each course
of blocks so they are more level.
Use a drum sander or large sander block to level off the top of the
tower with each course and you will have a gapless, new looking final tower.

|
|
|
The first level dice ramp is also visible in this picture.
The ramp is constructed from bass wood which is available at many hobby and craft shops.
Glue the ramp with the same tacky glue used on the blocks.
|
|
|
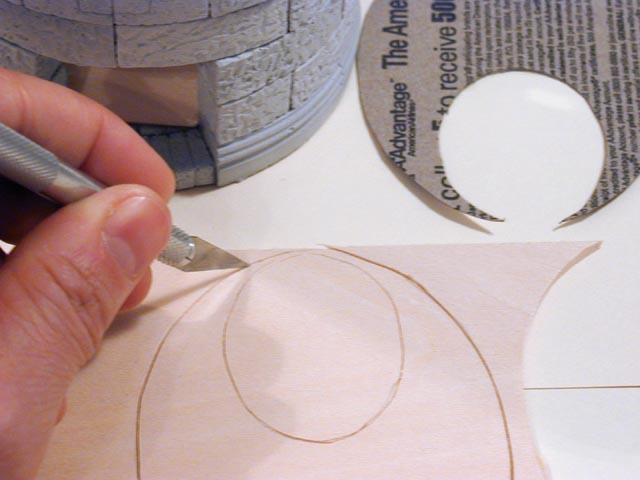
The dice ramp is constructed with the aid of a graphic drawing program such as Jasc Paint Shop Pro or Adobe Photoshop. Here is a 4 by 3 inch ellipse template for Paint Shop Pro. I printed the template onto paper. Then I transferred the paper template to cardboard from a cereal box. Finally the cardboard template is traced onto a piece of 3/32" (1 mm) basswood. Use an pointy razor knife to cut the ellipse from the basswood. Use multiple passes with your cuts so that you don't split the wood.
The upper ramps also need a hole to allow dice to fall to lower levels.
The hole is 2" (5 cm) in the long axis and slightly over 1" (3 cm) in the short axis.
|
|
|
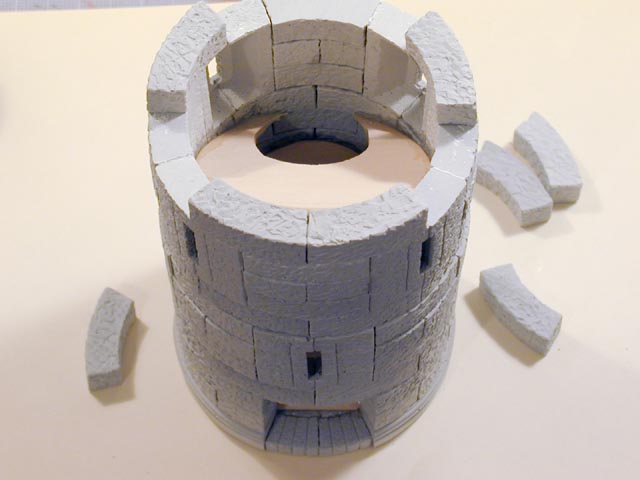
The second level ramp is highest over the doorway and lowest at the back of the tower. It is placed so that it avoids bisecting any windows. On taller towers you might want to make the ramps roll left-right and right-left. Since I only have three levels, my ramps all roll front-back or back-front.
Once several friends and I were dreaming about conceptual dice towers.
Of course, you can use these techniques to construct very high towers.
A 6 foot (2 meter) tower using these blocks would be fun.
Such a tall tower would take about 10 seconds to make a roll.
Another person thought of a motorized car to take the dice to the top.
With projects like these, only your imagination is the limit.
|
|
|
|
|
|
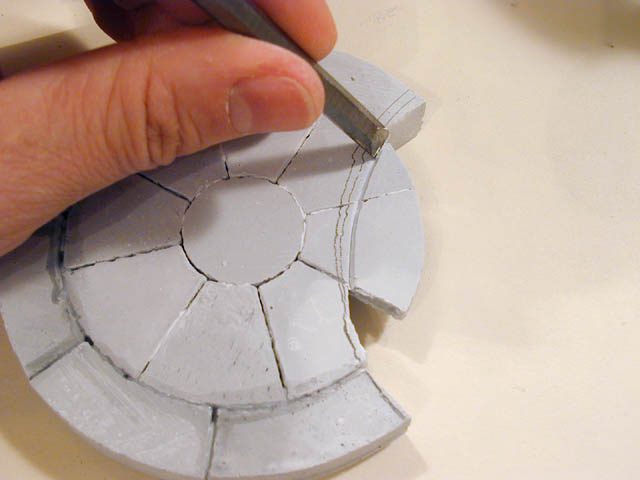
To break a plaster block, use a chisel or screw driver to score a line on both side of the block. When the score is about one quarter way through the block, you can snap the block along the score line. Straight lines snap much more easily than circular lines. Make the scoring lines for circles deeper to ensure that the block breaks along the score.
Also notice that the center circular block is half the thickness
of the normal one.
Only fill the mold halfway, and sand the block so it is the same
thickness as the stair blocks.
|
|
|
Notice that I put small ribs on each of the ramps. These ribs help catch the dice and roll them more randomly. Be careful that the rib is large enough to catch the dice, but not so large that the dice get stuck.
If I were to make one improvement to my tower, I would
make the wall of the dice tray higher.
Sometimes the dice shoot quickly out of the tower, and the
one course of stones is not enough to catch all dice on every roll.
A second course of stones would help catch even the very fast dice.

|
|
|
A lighter shade of gray has been dry brushed over the darker base coat. This brings out the texture of the brick. Again, you can do this painting with inexpensive paint from the home center or hardware store.
If you look closely, you will see moss growing in some of the stone joints. To help cover up my shoddy construction, I put some glue and some green flocking in the joints. This make the tower look more aged and realistic.
The dice rolling performance of the tower is pretty good. It can roll dice from as tiny
as 1 mm up to about 16 mm without any dice getting stuck.
Using my favorite 12 mm dice, I rolled dice in sets of
1, 2, 3, and 4, and after 100 rolls, no dice ever got stuck in the tower.
The larger 16 mm work well in sets of 3 or fewer, but large sets tend to leave a stuck die every
30 or so rolls.
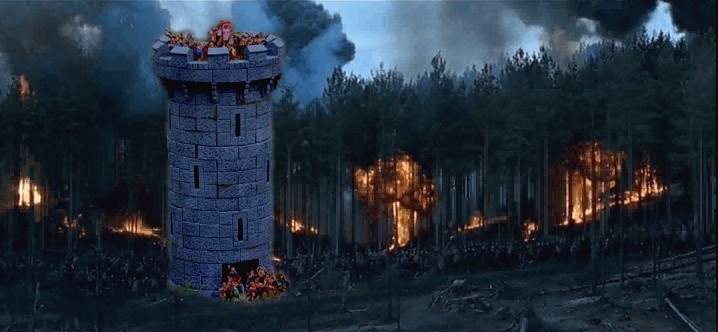
Here is one final photo of my tower superimposed on a dramatic backdrop for education purposes. What if the ancient Germans employed large stone towers against the imperial Roman Army in the 3rd century A.D.? And what if the Germans employed large stone dice to kill the advancing Romans? Well, a dice tower such as this certainly helps you answer these gut-wrenching questions. Thanks for reading this far, and feel free to email me if you have any questions or want to share your own dice tower projects. I hope you enjoyed this project as much as I have.
|
|
|